


Encoding Guide
- Presentation
- What You Need
- Step 1: Source Selection
- Step 2: Extract Movie/Episode
- Step 3: Index Video and Demux Audio
- Step 4: Generate Encoding Script
- Step 5: Determine Sample Aspect Ratio (SAR)
- Step 6: Level compliance
- Step 4: Generate Encoding Script
- Step 8: Mux
Presentation
Use this guide to encode DVDs to H.264. The guide is quite long because it covers many aspects of encoding. Read the sections that interest you.
What You Need
Tools and minimum versions:
- AviSynth 2.57
- DGMPGDec 1.5.0
- DVDShrink 3.2.0.15
- MeGUI 0.2.6.1046
- x264 build 928
- mkvmerge 2.2
- SDB MeGUI profiles 2.1
Follow installation instructions accompanying each software package. Additional installation notes:
Start MeGUI. Select 'No' when asked 'There are updated files available. Do you with to update to the latest versions?'
Disable the auto update feature: Options -> Settings -> Extra config -> UseAutoUpdate (untick)
Copy x264.exe into \Program Files\MeGUI\
Copy DGDecode.dll from \Program Files\DGMPGDec to \Program Files\AviSynth 2.5\plugins\
Extract sdb_profiles_2.1.rar file into directory: \Program Files\megui\profiles\Video
Step 1: Source Selection
For the majority of DVDs, select all VOB files apart from file 0 belonging to the largest titleset and drag them into DGIndex. Files can reside on harddisk if the DVD has already been ripped, or files can be located on a mounted physical DVD as long as AnyDVD is running. For example, in the image below, titleset 2 (files beginning with VTS_02) is the largest:
 Using the slider at the bottom of DGIndex's video window check for copyright warnings and trailers at the beginning and end. If encoding an episode of a TV series check there is only one episode. Skip to Step 3 if both checks are successful.
Step 2: Extract Movie/Episode
If there are trailers or warnings present, or the title set contains more than one episode of a TV series then additional processing is required using DVDShrink. Either click 'Open Files' and select the folder containing the downloaded DVD files or click 'Open Disc' if you're working from a disc.
- Click 'Re-author'.
- Drag the feature to be encoded from (usually) the Main Movie section into the compilation window on the left.
- Click 'Compression Settings'
- Select 'No Compression'
- Click 'Backup!'

Step 3: Index Video & Demux Audio
The video we want to encode is now loaded in DGIndex. Ensure your settings match those shown below:
Video
iDCT Algorithm ==> IEEE-1180 Reference
Field Operation ==> Honor Pulldown Flags
YUV -> RGB ==> PC Scale
Audio
Output Method ==> Demux All Tracks
Options
Enable Info Log
From the File menu select 'Save Project'. Type in a name or accept the default and click Save. After a short time the process will be complete. A file with extension .d2v will have been created and one or more audio tracks will have been demuxed.
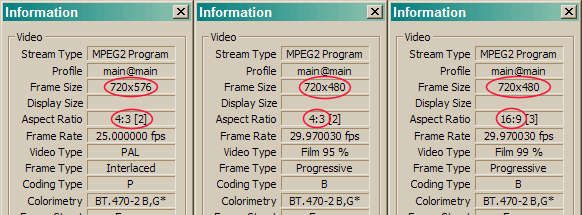
An information window will be displayed. Make note of the 'Frame Size' and 'Aspect Ratio' values, we will need them later. Some examples are shown below. This information will also be written into a log file when DGIndex is closed.
Step 4: Generate Encoding Script
Using your favourite editor create a base AviSynth script called encode.avs as follows:
MPEG2Source("VTS_01_1.d2v",cpu=0) # d2v file created from Step 3
Start MeGUI. Select 'AviSynth Script Creator' from the 'Tools' menu, then click the 'Video Input' browse button and select 'All files' from the 'Files of type' drop down menu:
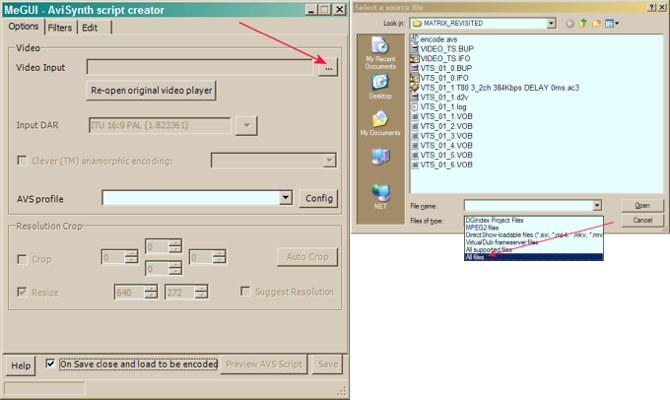
Select encode.avs and press Open. A preview window will appear. Do not attempt to resize the picture. If the picture looks squashed the DVD is anamorphic. The picture will be adjusted and displayed correctly during playback.
Important Note: At no point should the avisynth script be saved in MeGUI. Changes to encode.avs will be made manually in the following steps.
4.1 Deinterlace / IVTC
A compléter
4.2 Crop Black Borders
A compléter
Step 5: Determine Sample Aspect Ratio (SAR)
The Sample Aspect Ratio (SAR) determines how the image is displayed on playback. The following criteria determine the SAR to use when encoding:
- Source type, NTSC or PAL
- Frame type, Anamorphic Widescreen or Full Screen
- Whether the DVD was mastered as "ITU" or "non-ITU"
Use the method described below to determine the correct SDB Profile for MeGUI or --sar option for x264 command line encoding.
Save the following script as sar.avs:
avsfile = "encode.avs" # Encoding script
format = 1 # 1=NTSC, 0=PAL
wide = 1 # 1=Widescreen 16:9, 0=Full screen 4:3
#########################
ITU = (format==1?10:12)/11.0*(wide==1?4.0/3:1)
SARs = """"12:11","16:11","10:11","40:33","16:15","64:45","8:9","32:27""""
ITUprof = "SDB "+(wide==1?"ANAMORPHIC ":"")+(format==1?"NTSC":"PAL")
i=import(avsfile).converttorgb
i
ab = round(height*(sqrt(45.0/44)-1))
a = spline36resize(round(width*ITU),height)
a = a.addborders(0,floor(ab/2.0),0,ceil(ab/2.0))
bb = width(a)-round(width*ITU/sqrt(45.0/44))
b = spline36resize(round(width*ITU/sqrt(45.0/44)),height+ab)
b = b.addborders(floor(bb/2.0),0,ceil(bb/2.0),0)
interleave(a,b)
scriptclip("""subtitle("Playback Resolution: "+\
string(round(width(i)*ITU*pow(44.0/45,current_frame%2)))+"x"+string(height(i))+\
"\nMeGUI Profile: "+ITUprof+(current_frame%2==1?" NON-ITU":"")+\
"\nx264 --sar "+eval("select(2*format+wide+current_frame%2*4,"+SARs+")"),lsp=0)""")
Edit the first three lines:
- Set 'avsfile' to the name of your encoding script, typically encode.avs
- Set 'format' to 1 if the DVD is NTSC, set to 0 for PAL
- Set 'wide' to 1 if the DVD is anamorphic widescreen (16:9 reported in DGIndex), set to 0 for full screen (4:3 reported in DGIndex)
Load sar.avs into MeGUI. Using the preview window step through a frame at a time, frames will alternate between ITU and non-ITU sizing and will show the SDB profile and SAR for each at the top of the image. Choose which one you think looks correct. Ignore black borders introduced by this script (they won't be present in the encode), focus on aspect ratio. For example, the Universal 'Earth' logo should be as close as possible to circular.
Additional methods that can help determine if the source is ITU or non-ITU:
- If the DVD was produced around 2006 or later it's most likely non-ITU
- If 4 pixels or less were cropped in total from the width to remove black borders it's most likely non-ITU
- Make a comparison between a high definition source and the upscaled DVD
For reference, the following table shows the various SAR and SDB MeGUI profiles for each source type where 'Aspect' and 'FrameSize' are the values reported by DGIndex:
DVD Aspect FrameSize ITU SAR & SDB Profile Non-ITU SAR & SDB Profile
PAL 4:3 720 x 576 12:11 SDB PAL 16:15 SDB PAL NON-ITU
PAL 16:9 720 x 576 16:11 SDB ANAMORPHIC PAL 64:45 SDB ANAMORPHIC PAL NON-ITU
NTSC 4:3 720 x 480 10:11 SDB NTSC 8:9 SDB NTSC NON-ITU
NTSC 16:9 720 x 480 40:33 SDB ANAMORPHIC NTSC 32:27 SDB ANAMORPHIC NTSC NON-ITU
Step 6: Level compliance
If you wish to encode to an H.264 compliance level then read on, otherwise skip to the next section.
Calculate the number of reference frames as follows:
- Round up width and height (purely for this calculation, not the encode) to the nearest mod 16 value
- Reference frames = MaxDPB * 1024 / 1.5 / ( mod16_width * mod16_height )
- Round down the result
Select MaxDPB, --vbv-maxrate and --vbv-bufsize options from the table below depending on which level you wish to encode to:
Level MaxDPB vbv-maxrate vbv-bufsize
3.0 3,037.5 10,000 10,000
3.1 6,750 14,000 14,000
3.2 7,680 20,000 20,000
4.0 12,288 20,000 25,000
4.1 12,288 50,000 62,500
4.2 13,056 50,000 62,500
5.0 41,400 135,000 135,000
5.1 69,120 240,000 240,000
MaxDPB = Maximum Decoded Picture Buffer size. Although the table shows maximum values for --vbv-bufsize, this typically should be set to a maximum of 14000, it depends on the device you're encoding for.
Example:
Step 7: Encode
MeGUI or command line based x264 can be used to perform encodes.
7.1 MeGUI Encoding
- Select the browse button next to 'Avisynth Script' and select encode.avs
- Select 'Tools->Bitrate Calculator'
- Select the appropriate audio track(s) created by DGIndex
- Set the required file size and click apply
- Select 'MKV' from the 'File format' option menu
- Select the appropriate SDB profile from the 'Video profile' option menu using the SDB profile found in the SAR section above
- Click 'Enqueue'
- Select the 'Queue' tab
- Click Start. If prompted to create a 'Worker' say 'Yes'
To determine an appropriate file size make several encodes on a small section of the movie and compare screen shots from the same frame. Use the lowest bitrate possible while maintaining source transparency. To encode 5% of the movie for these comparison encodes add SelectRangeEvery(2400,120) to the end of encode.avs. Maximum file sizes allowed are listed in the rules.
7.2 Command Line Encoding
Here's an example of x264 command line parameters for a crf encode of our cropped PAL example: x264 --threads auto --thread-input --fps 25.000 --sar 12:11 --crf 20 --direct auto --deblock -3:-3 --ref 11 --subme 7 --me umh --merange 24 --partitions all --8x8dct --bframes 8 --b-pyramid --mixed-refs --b-rdo --bime --weightb --trellis 2 --no-fast-pskip --progress --output encode.h264 encode.avs
Step 8: Mux
Use mkvmerge, dsmux or their respective GUI's to merge the video produced by x264 and the audio track(s) extracted in Step 3 to create the final media file. Do not set the display aspect ratio, mkvmerge will set this correctly automatically when it examines SAR in the H.264 stream. The delay automatically placed into the filename of the demuxed audio track by DGIndex can be used as a starting point when syncing audio and video, it's not correct 100% of the time.
Command line example:
mkvmerge -o "The Matrix Revisited PAL DVD.mkv"
--engage keep_bitstream_ar_info
--title "The Matrix Revisited PAL DVD"
--language 0:eng -d 0 -A -S --track-name "0:The Matrix Revisited PAL DVD" encode.h264
--language 0:eng -a 0 -D -S --track-name "0:Main Feature" --sync 0:0 "VTS_01_1 T80 3_2ch 384Kbps DELAY 0ms.ac3"
--track-order 0:0,1:0
Add the command line option "--engage keep_bitstream_ar_info" for maximum compatibility. This option keeps SAR information embedded within the H.264 stream intact, enabling (for example) correct aspect ratio on the Play Station 3. This option can be added to the command line using mkvmerge GUI by selecting 'Muxing -> Add command line options' and typing it in. Ensure the command line does not contain option '--display-dimensions' as follows: Select the 'V_MPEG4/ISO/AVC' track, click the 'Format specific options' tab, select 'Aspect ratio' and leave the field blank.


